


To generate employee payslips from Excel, you do not need to design a salary-slip template, create a separate worksheet for every employee, or export PDFs one at a time. Prepare and approve your payroll in Excel, save the final upload sheet as a CSV file, and upload it to Salario’s free professional payslip generator. Salario turns each employee row into a professional payslip that you can review, download, or email.
This approach lets Excel remain your payroll working file while Salario handles the calculations, document layout, and PDF generation.
Why Creating Payslips Manually in Excel Becomes Difficult
Excel is useful for organising payroll. You can keep employee names, salaries, allowances, deductions, email addresses, and departments in one place. You can also compare the current month with the previous month and calculate control totals.
However, a payroll register is not an employee payslip.
Your internal workbook may contain information for the entire workforce, including bank details, approval notes, employer contributions, and total payroll cost. A payslip should show only one employee’s relevant earnings, deductions, and take-home pay for a specific period.
If you create the payslips manually in Excel, you must:
- Design the document yourself
- Link the template to the correct employee row
- Set print areas and page breaks
- Check that the right employee appears on every page
- Export each payslip as a separate PDF
- Rename and distribute every file
- Prevent one employee from receiving another person’s information
That may be manageable for two employees. It becomes repetitive and risky when the team grows. As your workforce grows, you may need to consider the best payroll spreadsheet alternatives for Nigerian businesses to automate calculations, payments, compliance, and record-keeping.
Salario removes the design and one-by-one export work. Your responsibility is to provide accurate, approved payroll data. The generator creates the employee-facing documents.
How the Excel-to-Payslip Process Works
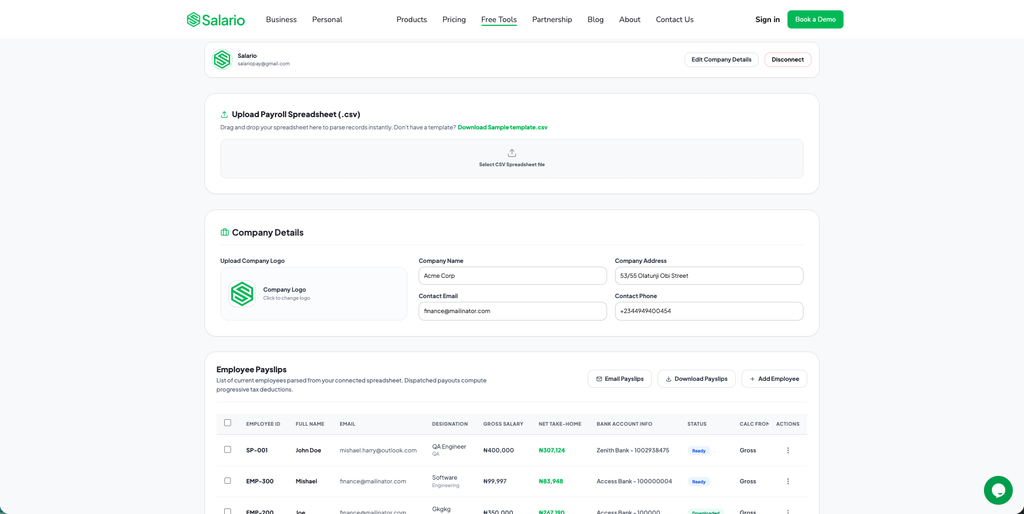
The workflow uses a simple spreadsheet structure:
- Each row represents one employee.
- Each column represents a particular field, such as employee ID, name, department, email, salary, or deduction.
- Salario reads the rows and creates a separate payslip for each employee.
The current bulk upload area accepts a .csv spreadsheet rather than a normal .xlsx workbook. You can still prepare and approve payroll in Microsoft Excel. You only need to save the final upload copy as CSV before uploading it.
In simple terms:
Prepare payroll in Excel → export as CSV → upload to Salario → review employees → generate payslip PDFs.
What to Prepare Before You Start
Use the approved payroll for the correct pay period. Before creating the upload file, confirm:
- The list of active employees
- Unique employee IDs
- Employee names, titles, and departments
- Valid email addresses for delivery
- Approved gross salary or target net pay
- Basic, housing, and transport salary structure
- Bonuses, commission, overtime, or arrears
- Current-period reimbursements
- PAYE and pension treatment
- Other authorised deductions
- New hires, exits, salary changes, and unpaid leave
- Final approval from the authorised payroll reviewer
Do not upload last month’s workbook without checking current changes. A generator can process the information it receives, but it cannot know that an employee resigned, received a promotion, or should no longer have a deduction.
How to Generate Employee Payslips from Excel with Salario
Step 1: Finalise and approve the Excel payroll
Open the workbook containing the current payroll and resolve any spreadsheet errors. Check formulas, employee status, salary changes, variable earnings, reimbursements, and deductions.
Save a protected approval copy before preparing the upload file. A clear filename might be:
Approved_Payroll_October_2026.xlsx
Keep this original workbook as the calculation and approval record.
Step 2: Open Salario’s bulk payslip generator
Go to the Salario payslip generator and select Bulk Employees Payslip.
The page also provides a Single Employee Payslip option. Use the single workflow for an individual correction or one-off document. Use the bulk workflow when you need to generate employee payslips from Excel for a complete team.
Step 3: Connect an approved company account
The bulk area requires an account connection before you can upload, view, download, or email bulk payslips.
Use a company-controlled account, not an employee’s personal login. Access should be limited to authorised HR, Finance, or payroll staff and protected with a strong password and multi-factor authentication.
Step 4: Download Salario’s sample CSV template
Select Download Sample template.csv.
Use the downloaded template instead of guessing the required headings. Salario expects specific column names and values, so do not rename, remove, or rearrange the headings unless the tool expressly instructs you to do so.
Open the CSV in Microsoft Excel and add one employee per row.
Step 5: Copy the approved payroll data into the template
Match the columns in your internal workbook to the corresponding Salario fields. For example:
- Staff number goes into
EmployeeID - Employee name goes into
FullName - Position goes into
Title - Business unit goes into
Department - Work email goes into
Email - Approved salary amount goes into
SalaryInput
The template also contains fields for bank details, salary structure, reimbursements, pension, NHF, health insurance, other deductions, monthly rent, and applicable employee classifications.
Leave internal approval comments and unrelated cost-centre notes out of the upload file.
Step 6: Choose gross or net as the starting point
The CalcFrom field tells Salario how to interpret SalaryInput.
- Enter
grosswhen the amount is the employee’s approved gross salary. - Enter
netwhen the employer has approved a target take-home amount.
Use the calculation basis stated in the employee’s compensation arrangement. Do not label gross salary as net simply to force a preferred result.
Step 7: Clean the spreadsheet
Before saving the CSV, check for:
- Duplicate employee IDs or rows
- Blank required cells
- Misspelled email addresses
- Former employees who should not be included
- Currency symbols or words inside numeric fields
- Spreadsheet errors such as
#N/Aor#VALUE! - Totals or subtotal rows that could be treated as employees
- Blank rows inside the employee list
- Incorrect
gross,net,true, orfalsevalues
Format employee-ID and account-number columns as text before pasting values. This prevents Excel from removing leading zeros.
If the workbook uses formulas, retain them in the approved .xlsx file. Paste the final approved results as values in the CSV upload copy.
Step 8: Save the worksheet as CSV
In Microsoft Excel, select File → Save As and choose CSV UTF-8 (Comma delimited) where available.
Give the file a clear name, such as:
Salario_Payslip_Upload_October_2026.csv
Excel may warn that CSV cannot preserve all workbook features. That is expected. A CSV stores the plain rows and columns needed for the upload; it does not retain multiple worksheets, colours, formulas, charts, or logos.
Keep the original .xlsx file separately. Upload the CSV copy.
Step 9: Upload and review the employee records
Return to Salario and upload the completed CSV.
After the file is processed, confirm that the imported employee count matches the approved payroll. Review employee names, IDs, email addresses, pay period, salary basis, earnings, deductions, and net pay.
Do not assume that a successful upload means every value is correct. Reconcile the generated records with the approved payroll totals before distributing any payslip.
If several records are wrong, correct the Excel source, export a clean CSV, and upload it again. This is safer than making many unrelated manual corrections.
Step 10: Download or email the payslips
When the imported records are correct, use Salario to generate the employee payslips.
You can download the PDFs for controlled storage and distribution or email them to employees. Verify every email address before sending because payslips contain confidential salary information.
Each employee should receive only their own document. Never send the complete payroll spreadsheet or attach several employees’ payslips to a group email.
What Salario Removes from the Process
When you generate employee payslips from Excel with Salario, you do not need to:
- Design a payslip template
- Insert and resize tables manually
- Create a separate worksheet for every employee
- Adjust margins or print areas
- Add page breaks
- Convert every employee’s sheet to PDF individually
- Repeat employer details on every document
- Rename dozens of unstructured files
Salario uses the spreadsheet data to create a consistent payslip layout. This allows the payroll team to focus on accuracy, approval, and secure delivery instead of document design.
Generate Employee Payslips from Excel Without Designing Them
Excel can remain the familiar place where your business organises and approves payroll. It does not have to become your payslip design studio.
To generate employee payslips from Excel efficiently:
- Finalise and approve payroll in Excel.
- Copy the approved values into Salario’s CSV template.
- Save the upload file as CSV.
- Upload and review the employee records.
- Download or email the professional payslip PDFs.
This workflow removes repetitive design and export work while giving employees clear, consistent salary documents. Generate employee payslips from Excel with Salario.